|
|
Tutorial: Department Maintenance |
|
|
Tutorial: Department Maintenance |
Departments are used by the Portal to group items according to the section of a store that sells them. An example of a Department might be the Menswear Department of a store that sells items such as shirts, ties and belts. The Company can use Departments in order to report on sales trends of items. However they differ from Locations because they are not used to report on stock holdings and are not necessarily in one physical location within a store. In this tutorial we will discuss the administration of Departments in the Portal.
There is a special menu for Departments that can be accessed from the Inventory Menu. Select Menus, Inventory and Department from the Navigation Menu to open the Department Menu and select the Maintenance section. A link is provided in the Maintenance section of the Department Menu to open the Company Options for Departments.

In the Portal Departments belong to both a Financial and a Reporting Division. Often these Divisions are the same, but can be different if necessary. These Divisions are created in the Financial Division and Report Division screens, accessed from the links in the Maintenance section of the Department Menu. Each of these screens lists the Divisions of the Company and a Division Name can be clicked on to edit the Division details. Alternatively use the Create a new Division to create a new Division in the Portal.
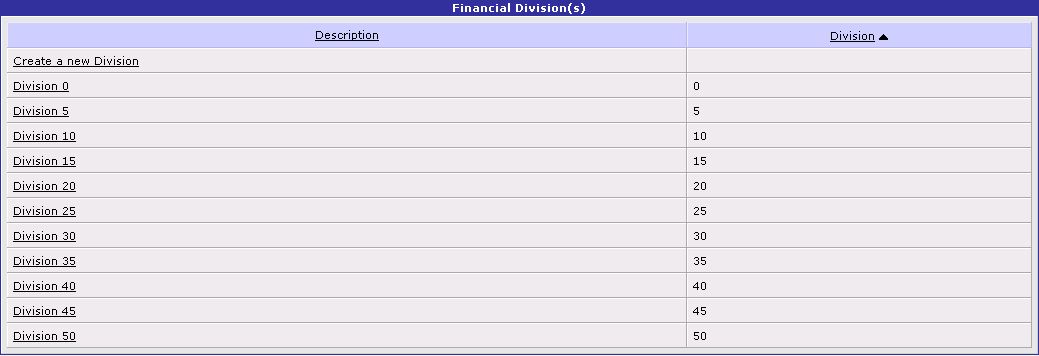
In the Division Maintenance screen enter a Division Number and Description of the Division. Press the Save button to save the Division details to the Portal or the Reset button to revert the changes to the last save. The New button can be used to create a new Division from the Maintenance screen and the Delete button will remove the current Division from the Portal.

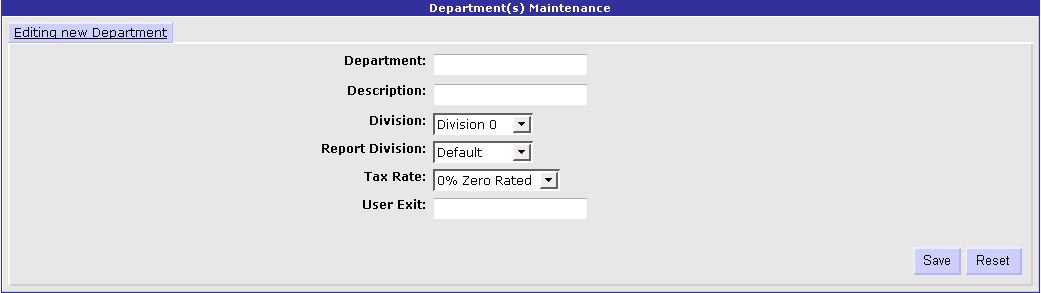
Select the Edit/View link from the Maintenance section of the Department Menu to open a list of Departments in the Portal. From this screen you can edit an existing Department by clicking on the Department Description or use the Create a new Department link to create a new Department. This opens the Department Maintenance screen where you can edit the details of a Department.

In the Department Maintenance screen enter a Department Number and Description for the Department. Select a Financial Division and Report Division from the drop-down lists provided. Choose a default Tax Rate for items in the Department. Press the Save button to save the Department's details to the Portal or use the Reset button to revert the changes to the last save. Use the New button to create a new Department from the Maintenance screen and the Delete button to remove the selected Department from the Portal.
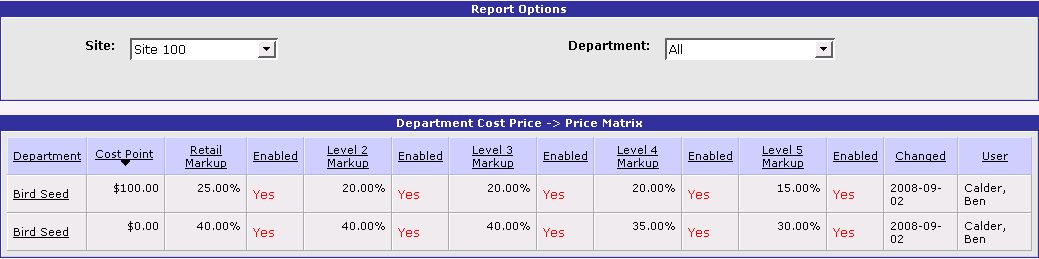
The final part of Department Maintenance has to do with the automatic pricing of items in a Department based upon the Department's Cost Matrix. The basic idea of the Cost Matrix is that the retail price of items in a Department is affected by a sliding scale matrix according to the cost of the item. In the Cost Matrix screen you set margins for items in the Department according to ranges of Costs. For example, you might set the markup of items that cost less than $10 to be 70%, items that cost between $10 and $70 to have a markup of 55% and items that cost over $70 to have a markup of 40%. You can even set different markup percentages for different Price Levels in the Portal. The matrix is used in Item Maintenance in the Pricing screen when a Cost is entered for an item and the Update Prices via Department Matrix button is pressed.
Selecting the Cost Matrix link from the Maintenance section of the Department Menu opens a report screen that lists the matrices that have been created for the selected Site. This report screen can be filtered by Department. Information displayed in this report includes the Department, Cost Point (where the settings for the row take effect), Markups for the Retail and other Price Levels, whether each Price Level is effected by the matrix, the date of the last change to the matrix and the name of the Portal User that made the changes.
The Cost Matrix for a Department can be edited by clicking on the Department name. In order to create a new matrix for a Department (only possible if the Department does not already have a Cost Matrix), select the Department from the drop-down list and after the report is reloaded click on the link that reads Add to Department Cost Matrix. This opens the Cost to Sell Price Matrix screen. Double-check the Site and Department drop-down lists to ensure that the Cost Matrix has the correct settings. Enter a Cost and press the Add button to add a line to the matrix with the specified minimum cost. Note that for a matrix to be valid it must contain a line with the minimum cost of 0. Enable any or all of the Price Levels (but at least one) for the cost entered by ticking the appropriate boxes. For each Price Level that is enabled, enter a markup for the Price Level to use when calculating the Price automatically from the cost. Press the Update button to save the matrix after each row is added. Select a row and press the Delete Items button to remove it from the matrix.

In this tutorial we have discussed the administration of Departments which are used to group items together. Departments are a useful reporting tool and can be used to create pricing structures based upon the costs of items in the Department. They are not used to determine when to reorder stock (that is done at the Location or Site level), but can give an overview of the performance of different areas of a store. Using Departments can increase the effectiveness of the reporting capabilities of the Portal.